
“How do I get rid of old courses and see new courses?”
As new quarters begin, we often want to clean up our Canvas sites and move old courses. Obviously we don’t want to scroll through pages and pages of old courses just to find one course.
Fortunately, Canvas has an easy way to “star” the courses you use most frequently so they conveniently appear on your Dashboard page. You can even customize the course icons on the dashboard so that they are easily recognizable and represent your course topics.
When you log into Canvas, the Dashboard is the first page you will see, and it will show you all your current courses. The Dashboard shows each of your courses as a course “card” which you can click to enter your course site.
If you are enrolled in more than one Canvas course, you have the ability to customize which courses you want to be displayed on your dashboard so that you can easily see them when you login. These are called favorite courses. If you have selected at least one course as a favorite, only your favorite courses will appear on the dashboard.
If you don’t have any favorite courses, the courses list automatically displays all your courses alphabetically. Also, in the Dashboard, courses will be grouped by your enrollment type. Any courses that you are an instructor in will be listed first, followed by TA roles and any other custom instructor-based roles. Your courses with student roles are listed last.
HOW TO FAVORITE COURSES
- In the Global Navigation menu, click the Courses link.
- Click the All Courses link.
- Click the star next to a course to favorite it.
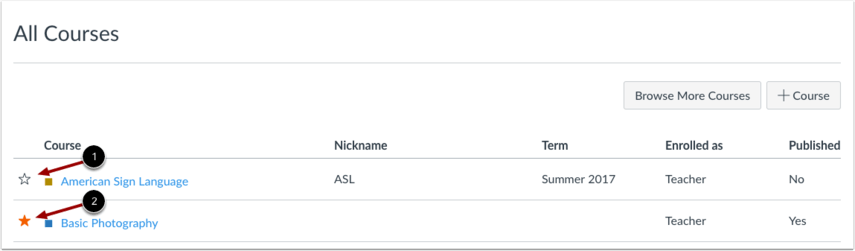
(1) Empty star denotes a course that is not a favorite. (2) Filled star denotes a favorite course.
After you have manually favorited at least one course, Canvas automatically favorites any new published course enrollments for you. Thus, at the beginning of the next quarter new courses released from the registrar will be automatically favorited for you.
CUSTOM NAMES AND COLORS
If your course has a long or confusing name, or even if you just want to label it differently, you can create a nickname for your course. Course nicknames appear in the Dashboard, Course Navigation Menu, course breadcrumbs, and notification emails. However, please note that a course nickname does not affect the course name at the account or course level; it only changes the name of the course for the individual user who created the nickname. Thus, students will not see the nicknames you have created.
Each user can set their own nicknames. If at any time you need to check the original name of the course, you can always hover over the nickname and the original name will appear in a pop-up.
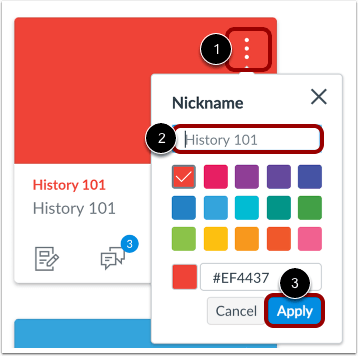
To set a course nickname and color:
- Click the More Options icon on the card.
- Type the name in the Nickname field.
- Select a color or provide the HEX code for a custom color.
- Click the Apply button.
MOVE COURSE CARDS
To reorganize your courses on the Dashboard, you can adjust their order to match your preferences. To do this, click the Move tab in the course options menu. You’ll have several options: Move to top, Move up, Move down, and Move to bottom. Simply select the desired option to move the course you want to a different position within your list. You can also use the Unfavorite option to remove a course from your Dashboard if you no longer want it to appear. This customization helps you keep your most important courses easily accessible.

As an alternative, you can manually rearrange your courses to another location in the Dashboard. Click a card course and move it to the desired location.
CUSTOM IMAGES
Instructors can also add images to display on their course cards. Canvas can accept images that are in JPG, JPEG, GIF, and PNG formats. For best results, please make sure that your images are approximately 262 pixels wide by 146 pixels high. When added to a course card, your image will be displayed behind a color overlay in the course card. The color overlay can be completely removed by a user so that only the uploaded custom image shows.
To add a custom image:
- In the Course Navigation menu, click the Settings link.
- Click the Feature Options tab.
- Toggle “Enable Dashboard Images for Courses” to On.
- Click the Course Details tab.
- Click the Choose Image button.
- To upload your own image, drag and drop your image in your browser or click the browse your computer link and locate an image.
- View the image as it will be shown in the Dashboard course card.
- Click the Update Course Details button.
- By default, course cards with an image include a color overlay. To remove the color overlay from all course cards that contain an image, click the Options menu (column of dots) at the upper right of the Dashboard and deselect the Color Overlay option.
CHANGING THE DASHBOARD VIEW
By default, the Canvas Dashboard uses the Card View, presenting your courses as individual tiles with customizable colors and images. However, you have other view options to match your organization style:
- List View: This option organizes all your course To-Do items in a streamlined agenda view, helping you track tasks across all courses. It includes instructor-assigned tasks, self-added items, calendar events, and announcements. Keep in mind that this view shows all courses, not just your favorites, which can make it busier if you’re enrolled in many classes.
- Recent Activity View: For those who prefer a feed-style approach, this view highlights the latest announcements, messages, assignment notifications, and discussion updates across all your courses, providing a quick snapshot of recent updates.
Additionally, the Card View can include a Color Overlay feature, which applies a semi-transparent layer of your selected course color over the background image. This helps you visually organize your courses, but you can disable this feature if you prefer to display the original course images without a tint. When turned off, the course color will appear as a small circle behind the card’s options icon instead.
HELP AND FURTHER RESOURCES
For more details and step-by-step instructions, please see Canvas’ documentation:
- How do I use the Dashboard as an instructor?
- How do I customize my Courses list as an instructor?
- How do I view course cards in the Dashboard as an instructor?
- How do I add an image to a course card in the Dashboard?
If you need further advice and assistance with customizing your dashboard, or if you have other questions, Academic Technology Solutions is happy to help. You can attend one of our walk-in sessions held in the TechBar of the Regenstein Library (see our workshop schedule for upcoming sessions), or contact us at academictech@uchicago.edu.