Whether you’re distributing course documents or giving quizzes, it’s important to make sure that the materials on your Canvas course site are secure. Making sensitive materials too easily available increases the risk of academic dishonesty among your students. In this two-part series, we will present some tips for organizing your Canvas course site to maximize security and thwart would-be cheaters.
Files
The Files section of your course site, which is accessible through the link in the left-hand course menu, stores all the files associated with your course. Since files uploaded to Canvas, unlike other content types, are published by default, you should take steps to restrict your students’ access to sensitive files.
Disabling the Files Link
It is often ideal to place all material intended for student use in Modules and then disable the Files link in the left-hand course menu. This ensures that students will be unable to view any files that are not in a module. When a new course site is created in Canvas, the Files link is disabled by default. For more on enabling or disabling the Files link, see Canvas’ documentation on managing Course Navigation links.
When you are setting up your Canvas course site, it is a good idea to coordinate with your co-instructors, teaching assistants, and graders and ensure that you are all clear on how you will be using the site. This reduces the risk that the Files link will be mistakenly enabled.
Restricting Folder Access in Files
If it is important that students be able to use the Files section of your course, you should place any sensitive materials in folders and restrict access at the folder level to control which files your students can and cannot view. To do this:
1. In Files, create your new folder by clicking the +Folder button, entering the folder name, and clicking the check mark.

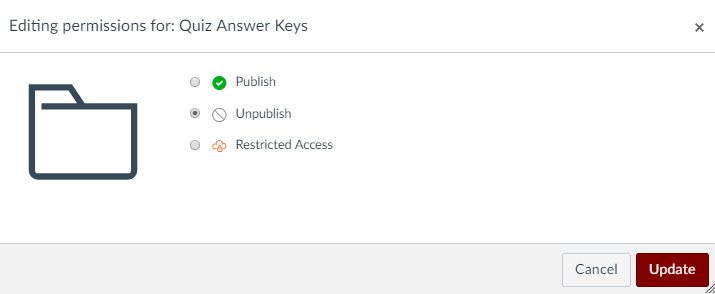
2. Your new folder will be published by default, as indicated by the green check mark. To change its status, click this check mark.
![]()
3. If you select Unpublished, the folder and all files contained in it will be invisible to students, even if the Files link is enabled. You can use this option for any files that you never want students to view.
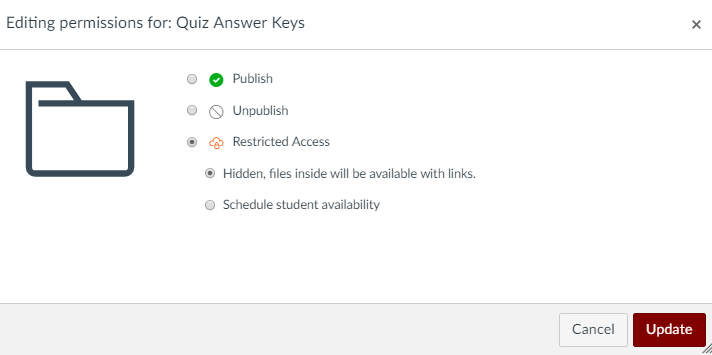
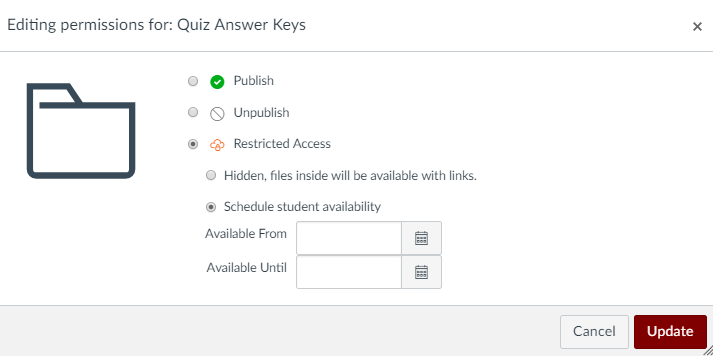
4. If you select Restricted Access, you have two further options.
- Hidden, Files inside will be available with links: Students cannot view the contents of the folder in the Files section of the course, but you can give a direct link to any file in the folder to your students. Only students with the link can view the file.
- Schedule student availability: This option allows you to set a date and time at which the folder will become available to students, and a date and time at which it will no longer be available to them. This can be very useful if, for example, you want your students to be able to view the answer key to an exam for a fixed period of time after the exam is complete.
5. Once you have selected the desired privacy level, upload your files into the folder.
For more information, see Canvas’ documentation on restricting access to files and folders.
Modules
When you add files to a module and then publish the module, the files in it will become accessible to students. If you want to restrict students’ access to files contained in a module, you can lock the module and then set a date and time at which it will automatically unlock. So long as the module is locked, students cannot access any items in it. See Canvas’ documentation on locking modules for detailed information.